
Stop using default iPhone camera settings
If you're sticking with the default iPhone camera settings, you might be missing out on the incredible video quality your phone is actually capable of. Whether you're shooting YouTube videos, Instagram Reels, or just capturing memories, knowing which setting to use can drastically change the look and feel of your footage.
There are about eight different video combinations available on the Pro models—ranging from 720p to 4K at various frame rates—and each has a specific purpose. Here is a breakdown of every single setting so you know exactly when to use what.
First: Clean your lenses
Before you even open the settings menu, there is one physical step that ruins more footage than any software setting: dirty lenses. Dust and fingerprints pile up constantly.
There is actually a setting that can help you remember this. Go to Settings > Camera and scroll to the bottom to find Lens Cleaning Hints.
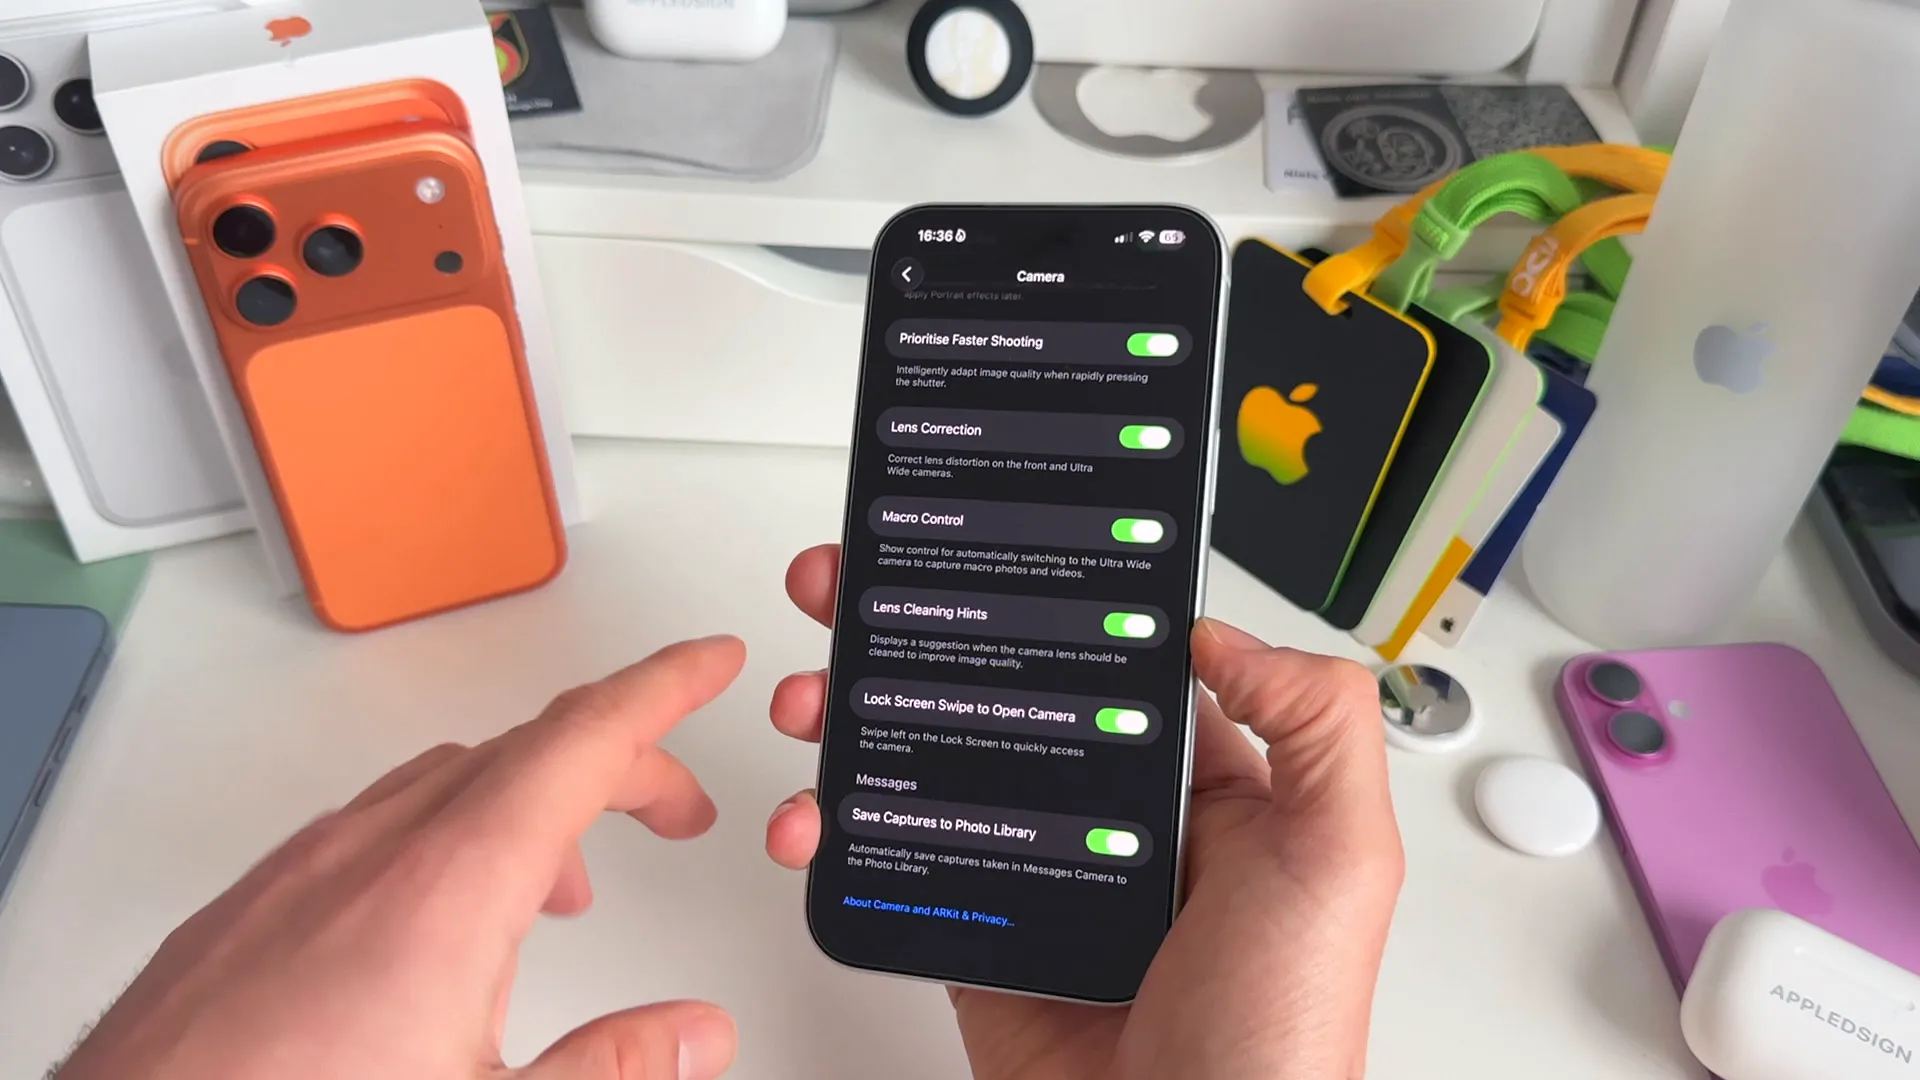
Toggle this on. Your iPhone will now detect when the lens is dirty and nudge you to give it a wipe before you start shooting. It’s the easiest way to instantly improve your image quality.
The storage savers: 720p and 1080p
These formats are lower resolution, meaning they take up less space on your phone but offer lower detail.
720p HD at 30 fps
This is the lowest quality format available. It shoots at a resolution of 1280x720. Ideally, you should avoid this in 2024 unless you are strictly trying to save storage space or need to send a very small file size quickly.
1080p HD at 30 fps
This is often the default setting. It records at 1920x1080 pixels. It consumes about 60 MB per minute of footage.

It’s a solid middle ground if you are just starting out with YouTube videos and don't want to worry about managing massive files. It looks decent, but it lacks the sharpness of 4K and the smoothness of 60 fps.
1080p HD at 60 fps
The jump to 60 frames per second (fps) makes motion look much smoother. This format is great for social media content where you want that fluid, "real-life" motion without the massive file sizes of 4K.
The cinematic formats: 4K at 24 and 30 fps
When you switch to 4K, you get four times the resolution of 1080p (3840x2160 pixels). This is where the iPhone camera really shines.
4K at 24 fps
This is the "Film Style" setting. Traditional movies are shot at 24 frames per second.
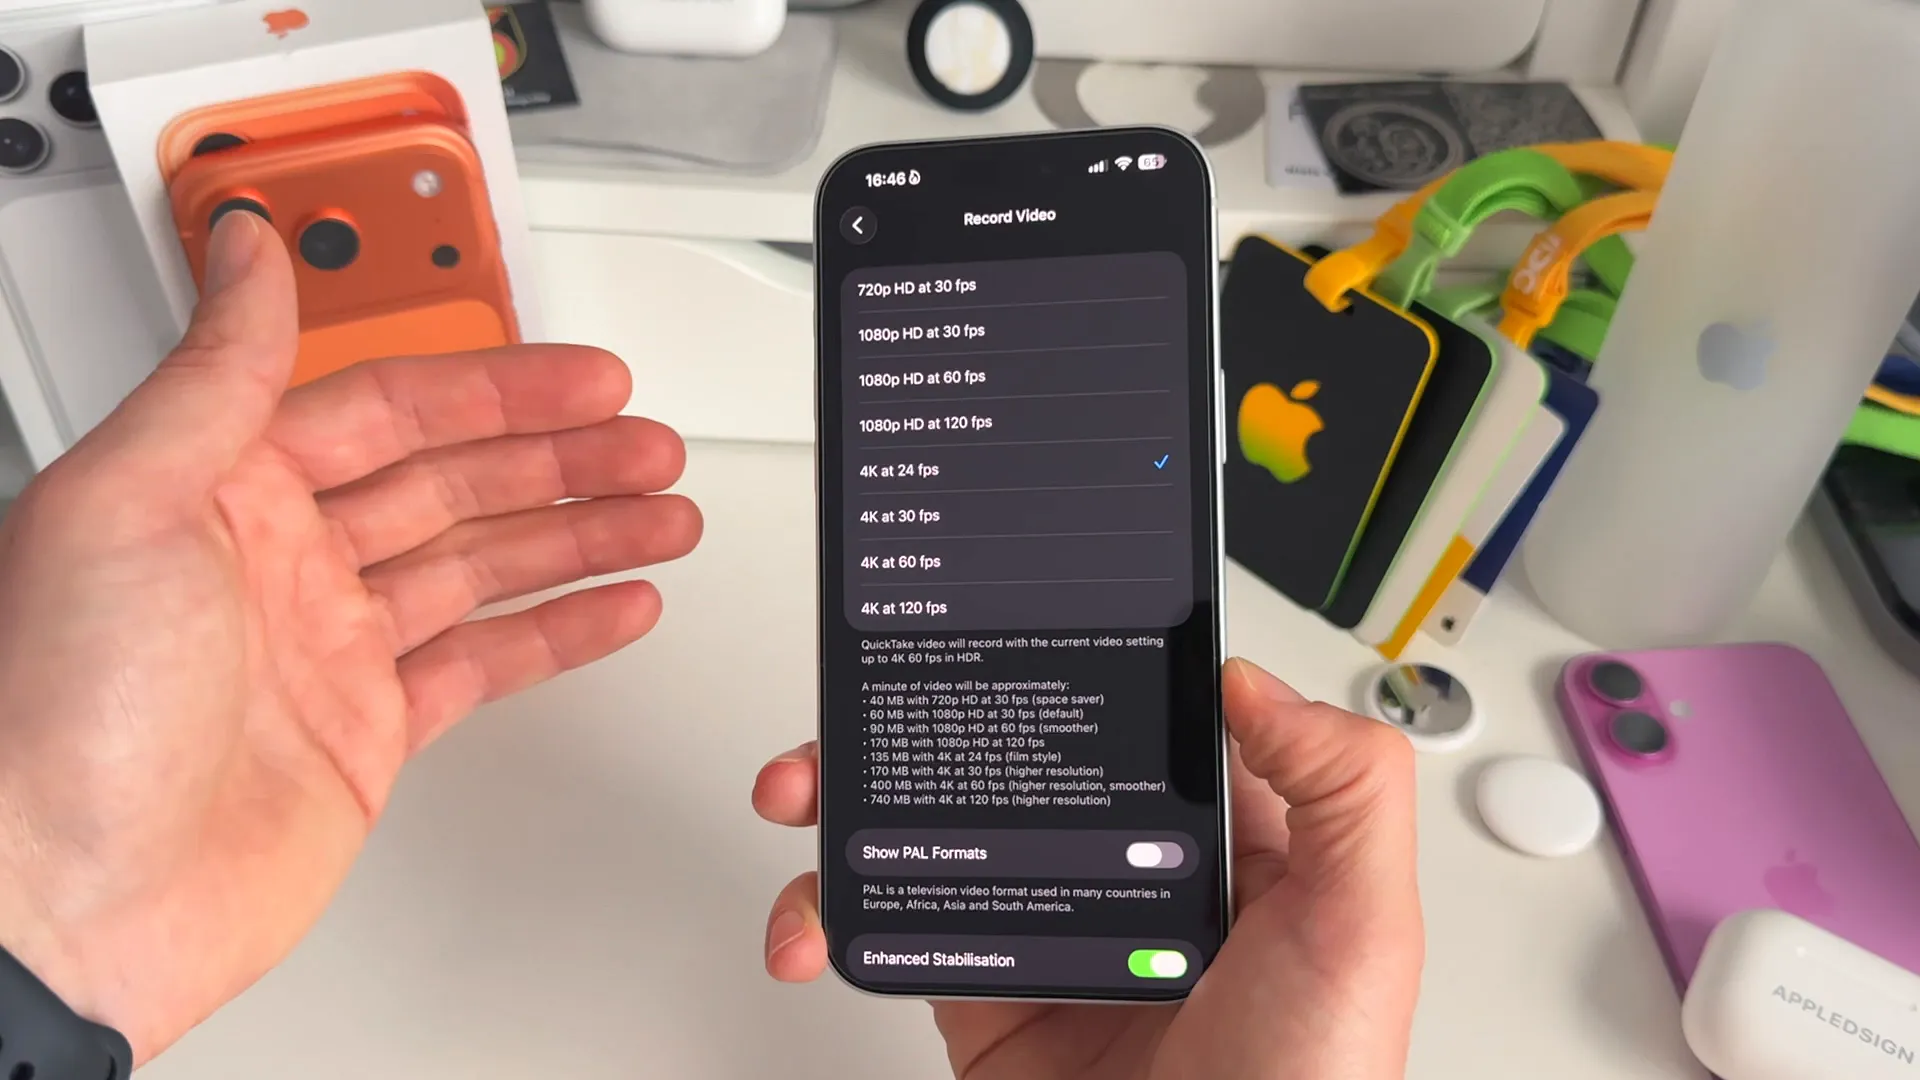
Choosing this format gives your videos a natural motion blur that feels cinematic. If you are shooting a short film, a travel vlog with a moody aesthetic, or anything where storytelling is the focus, this is the setting to use.
4K at 30 fps
This is a step up in smoothness from 24 fps but keeps a natural look. It’s excellent for general content creation, like "talking head" videos or tutorials. It offers slightly less motion blur than 24 fps, making it look a bit sharper to the eye while still feeling natural.
The powerhouses: 4K at 60 and 120 fps
These settings offer the highest quality and smoothness but come with a significant trade-off in storage space.
4K at 60 fps
This creates incredibly smooth, high-resolution footage. It’s perfect for high-quality YouTube videos, crisp Instagram Reels, or TikToks.
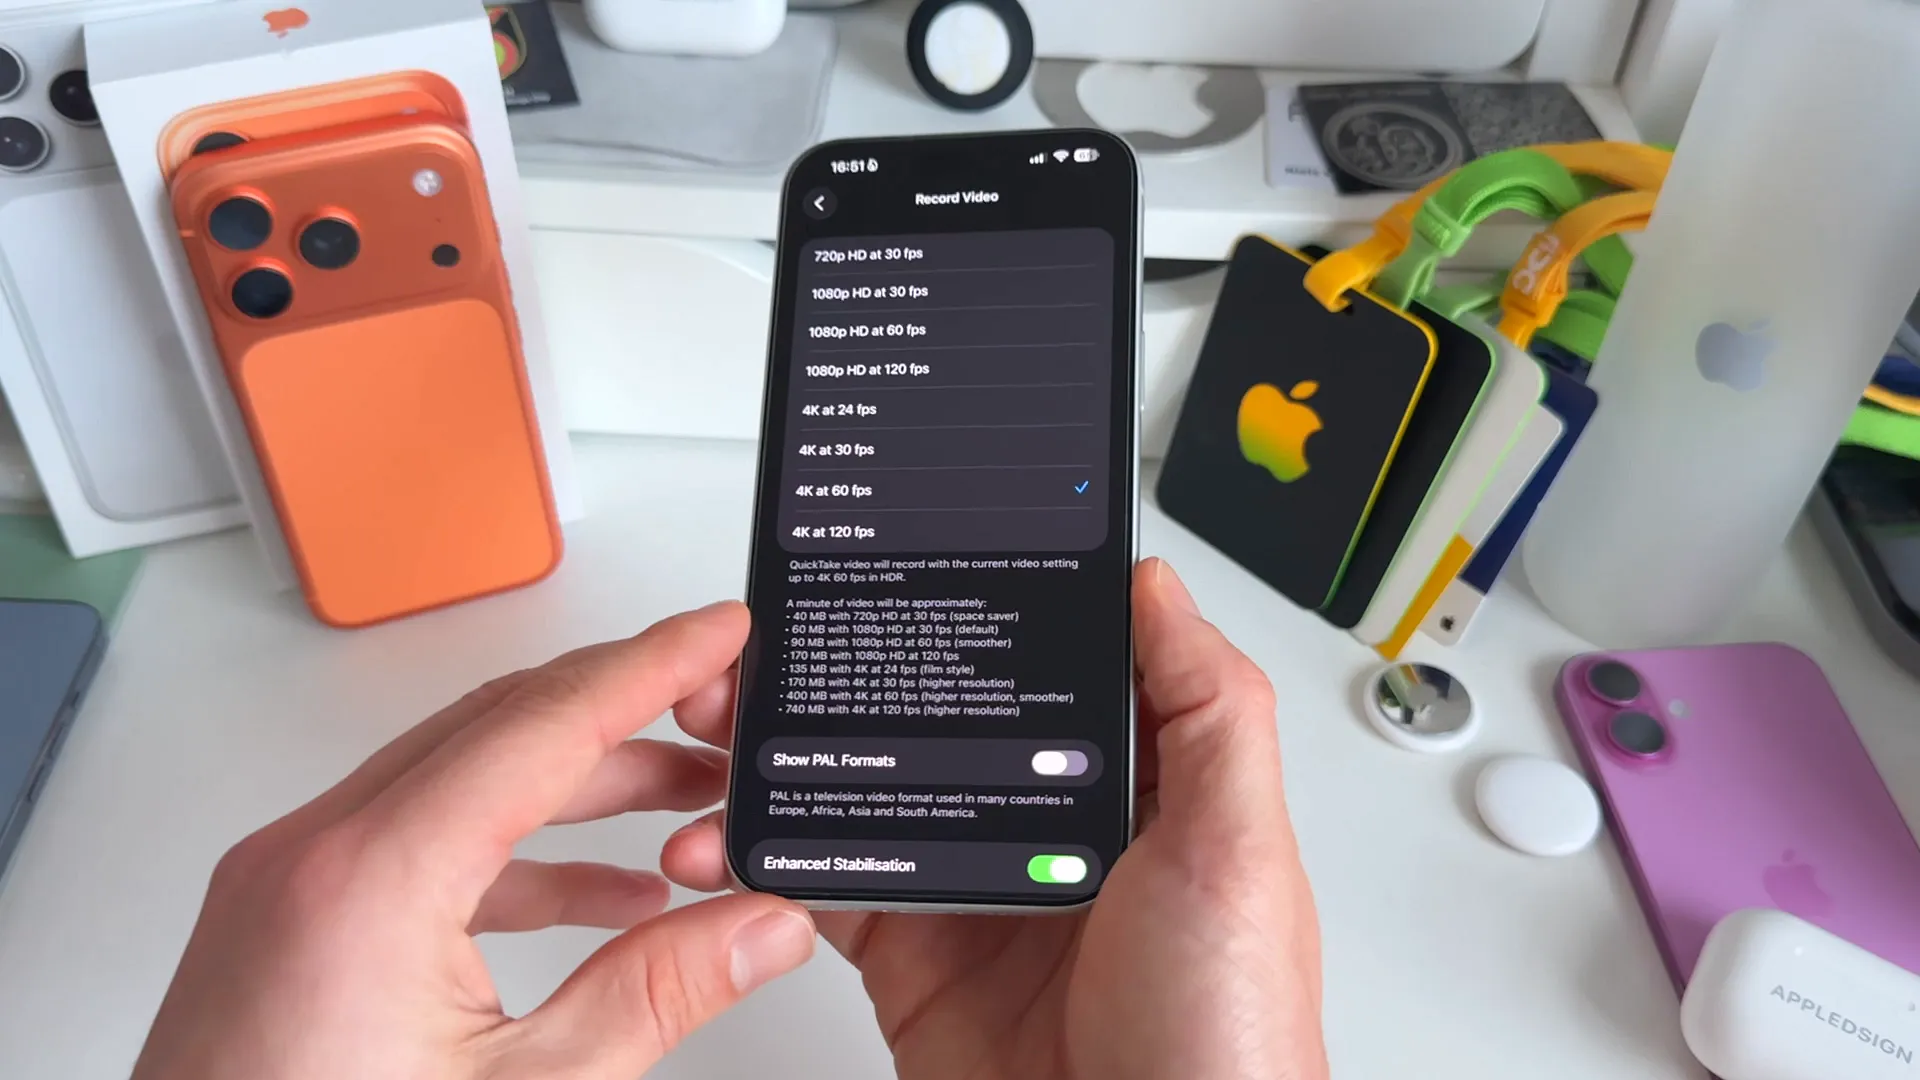
However, be careful: this format eats up about 400 MB per minute. If you shoot in this format constantly, your iPhone storage will fill up very fast.
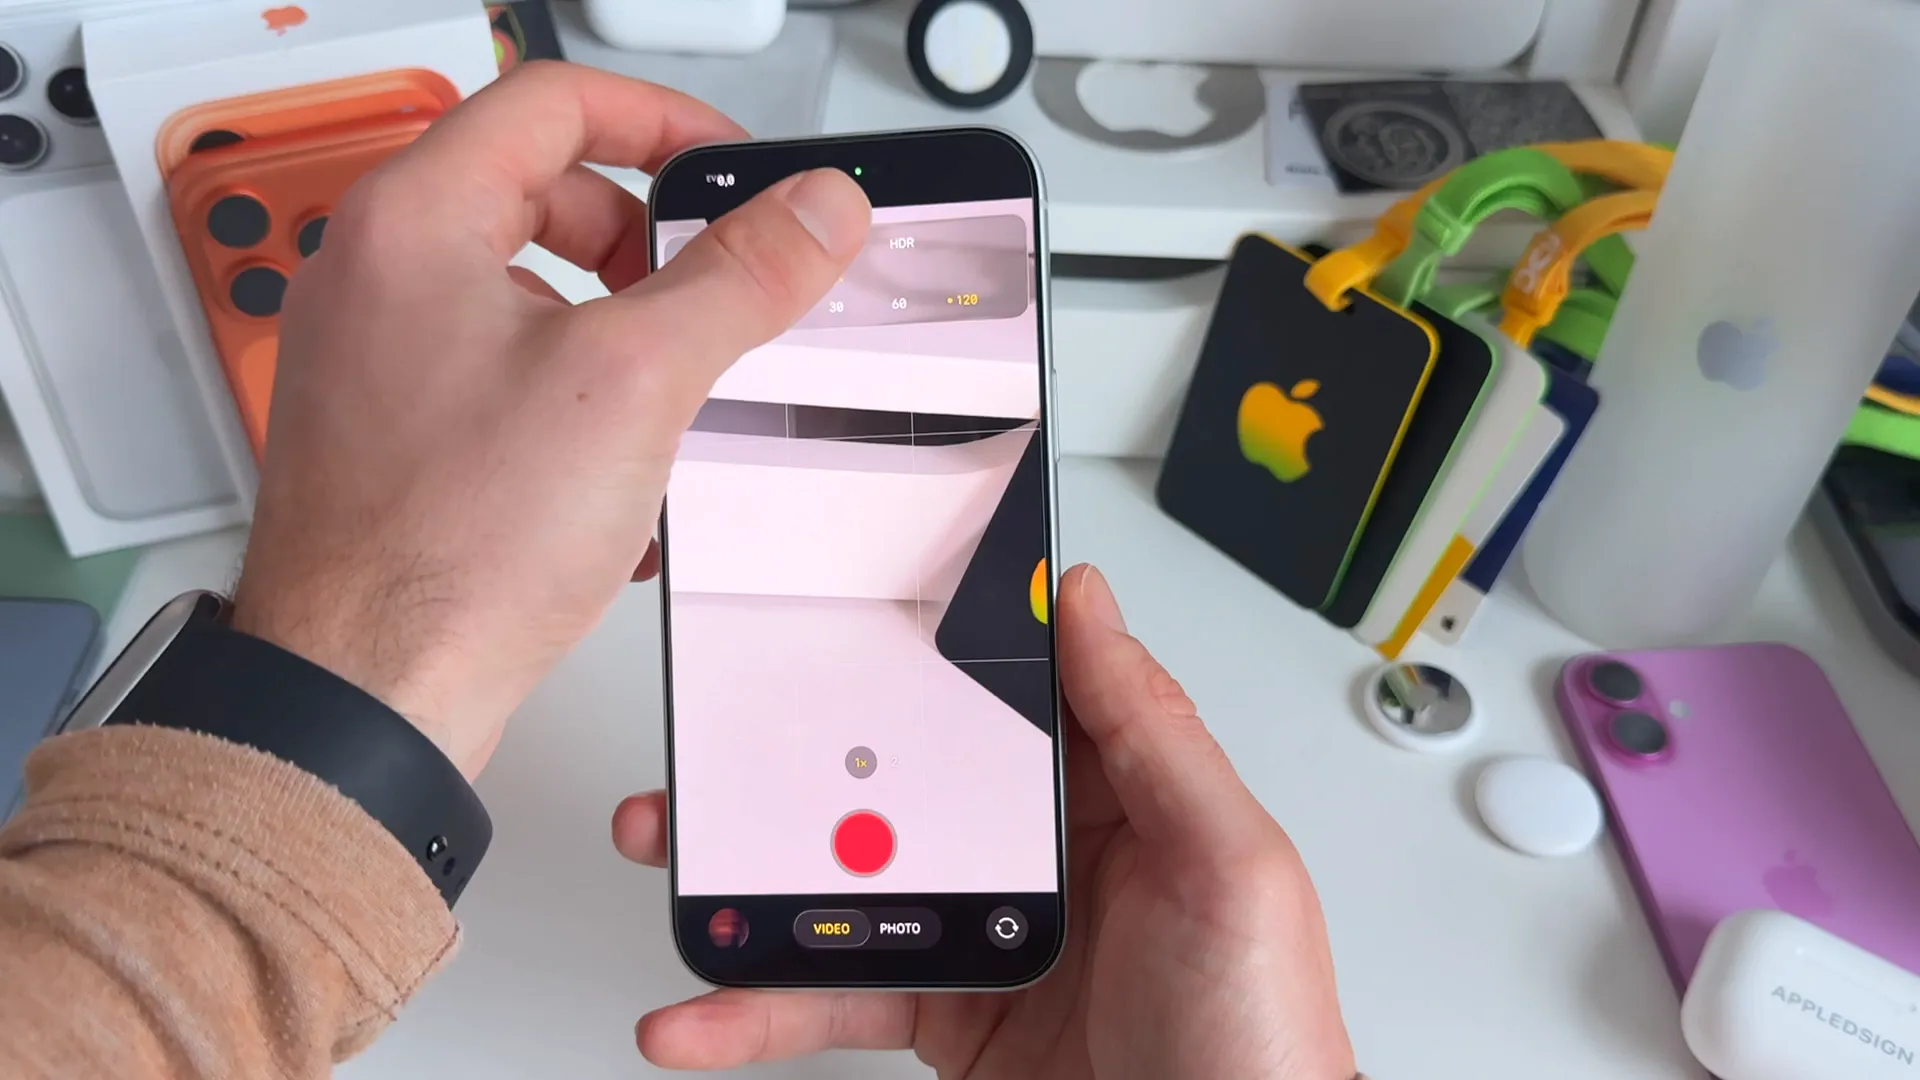
4K at 120 fps
This is the ultimate setting for cinematic slow motion. Shooting at 120 frames per second allows you to slow the footage down to 25% speed in editing without any stutter.
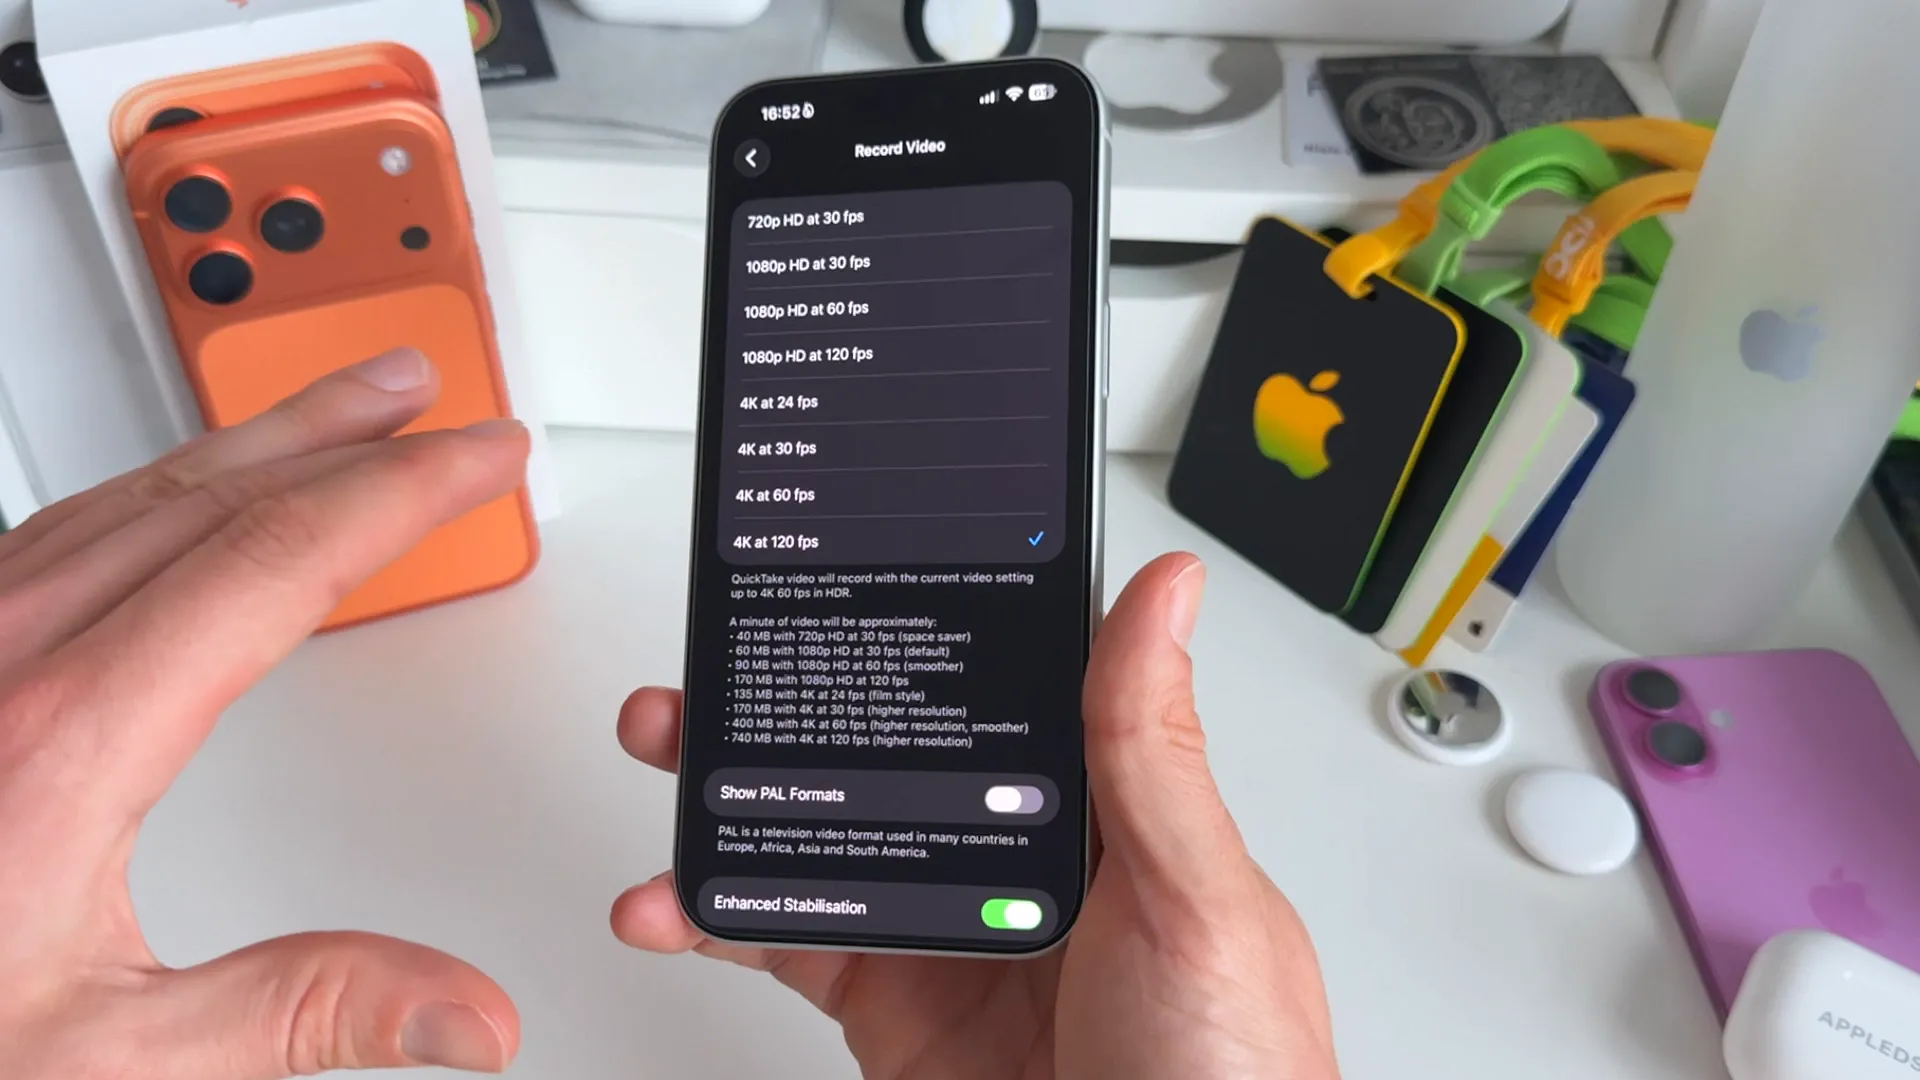
It looks incredibly dramatic for sports, fitness videos, or "B-roll" sequences. Just know that this consumes roughly 750 MB per minute—nearly double the storage of 4K 60 fps. Use it sparingly for specific shots, not your whole vlog.
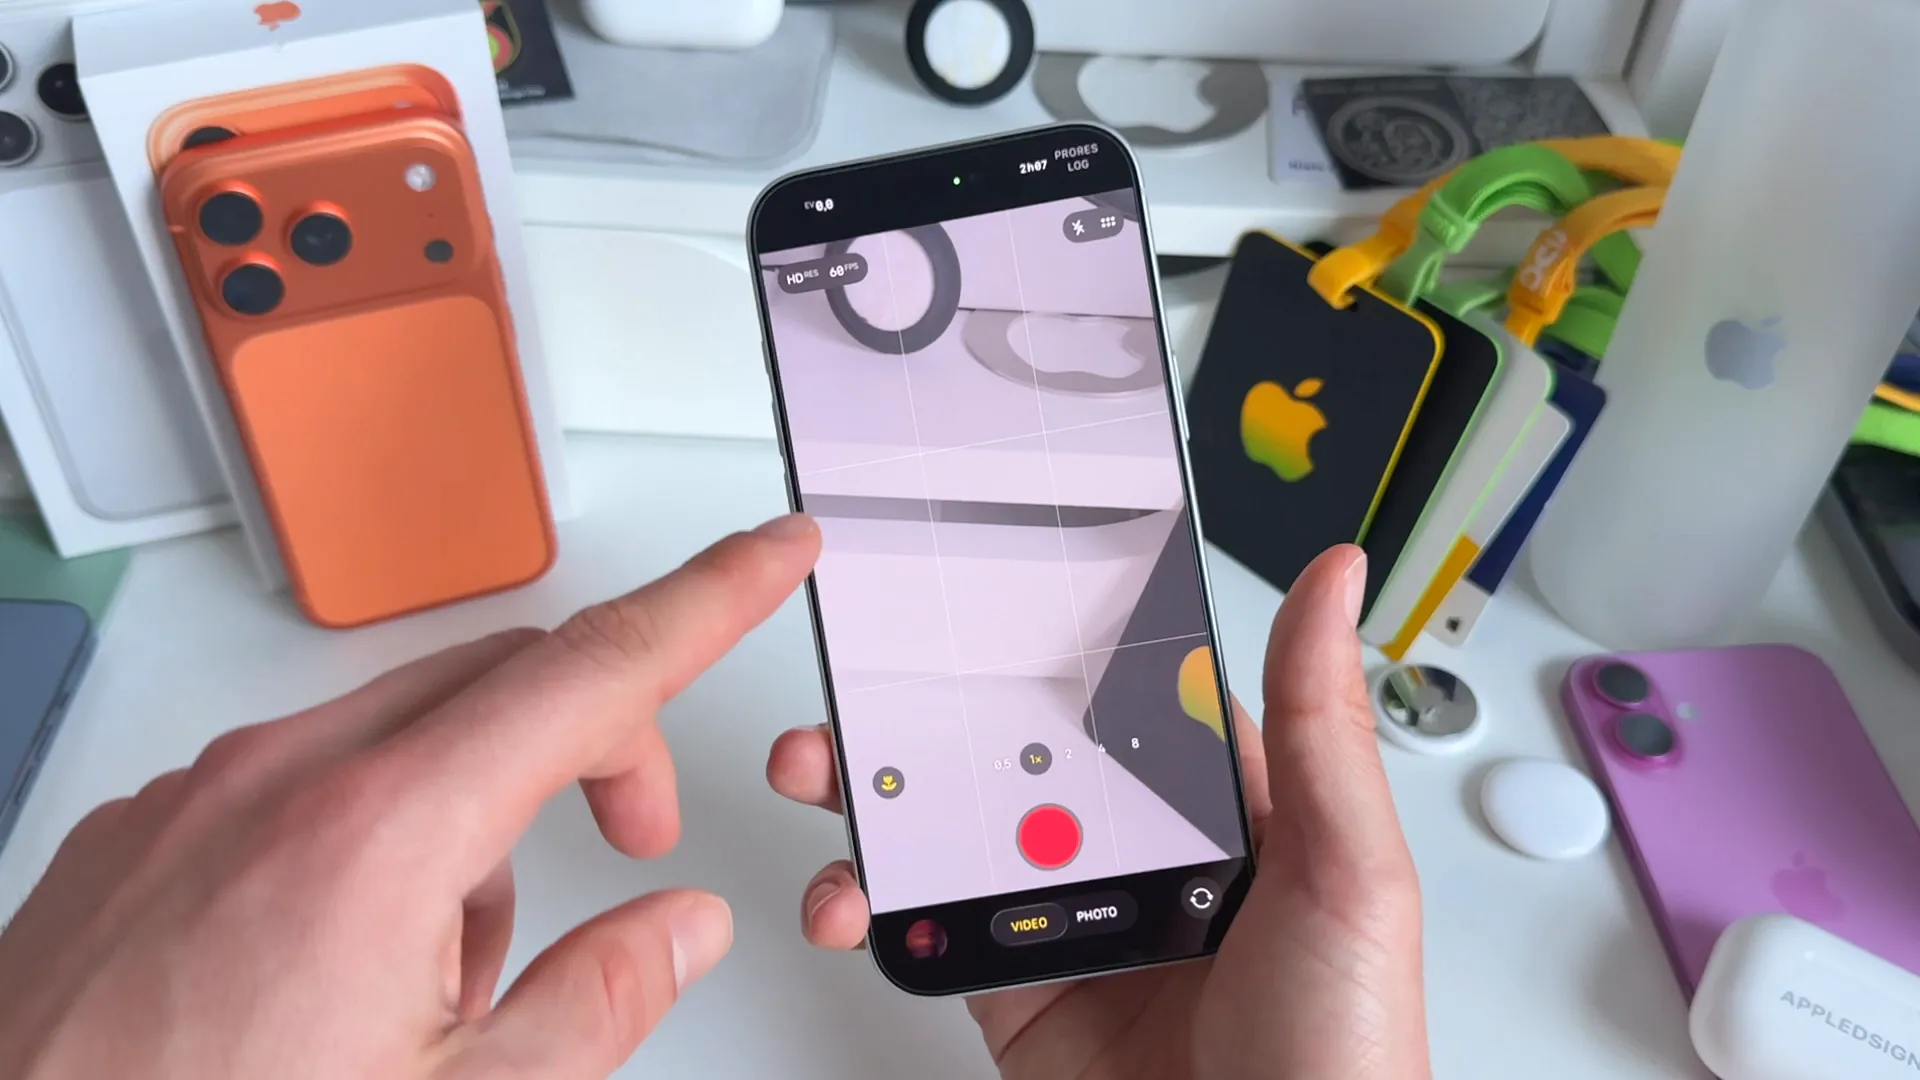
For the professionals: Apple ProRes
If you have an iPhone 13 Pro or newer, you have access to Apple ProRes. This isn't just a resolution setting; it changes how the camera processes color.
When you shoot in standard modes, Apple applies its own filters and color profiles to make the image look "good" instantly. ProRes (specifically in Log mode) removes a lot of that processing, resulting in a flat, gray-looking image.
Why would you want that? Because it preserves more data. It gives professional editors complete control to color grade the footage manually in post-production. You can make the greens greener or the shadows darker exactly how you want them, rather than how Apple thinks they should look.
Warning: ProRes files are massive. If you want to shoot 4K ProRes at 60 fps, the iPhone actually requires you to connect an external storage drive, because the internal write speed and storage capacity often aren't enough to handle the data stream.
The bottom line
There is no single "best" setting—it depends entirely on what you are shooting.
- Vlogging/Storytelling: Stick to 4K at 24 fps or 30 fps for a natural look.
- Social Media/Action: Use 1080p or 4K at 60 fps for smoothness.
- Cinematic B-Roll: Switch to 4K at 120 fps and slow it down later.
- Professional Work: Use ProRes if you plan to color grade (and have the hard drive space).
Last updated: Jun 20, 2026